HAPPY BIRTHDAY!
Sunday, July 10, 2011
Happy Birthday K!
I remember the day you were born 9 years ago like it was yesterday. It was one of the best days of my life when I finally got to meet you. You are such a great daughter and are becoming an amazing young lady. You are a hard worker, smart, kind, athletic, and a great big sister. I love you K! I'm proud to be your mom.
HAPPY BIRTHDAY!
HAPPY BIRTHDAY!
Labels:
kids
Saturday, July 9, 2011
Features
I was featured on two blogs recently. You might want to check them out!
My stripping tutorial was featured on Tip Junkie. I really love this blog. She collects great ideas from all over Blogland and posts them. If you don't already follow, I suggest that you start NOW!
Knock Off Decor features great tutorials on how to recreate your favorite things fromoverpriced fabulous retailers such as Anthropologie, West Elm, Pottery Barn, Ballard Designs, etc. at a fraction of the cost. She was kind enough to feature my coffee table.
Thanks ladies for featuring my little blog!
My stripping tutorial was featured on Tip Junkie. I really love this blog. She collects great ideas from all over Blogland and posts them. If you don't already follow, I suggest that you start NOW!
Knock Off Decor features great tutorials on how to recreate your favorite things from
Thanks ladies for featuring my little blog!
Labels:
before and after,
features,
tutorial
Friday, July 8, 2011
Feature Friday #5
Today's feature is Gloria of the blog Potentially Beautiful. Don't you wish you could find beautiful pieces of furniture by the side of the road? Yeah, me too. Anyways, Gloria's sister found this diamond in the rough waiting to be picked up by the trashman, but she picked it up instead:
Lucky for Gloria, her sister gave it to her. Gloria painted it with white chalkpaint. The veneer on the top was in rough shape, so instead of refinishing it, she covered it with random book pages stuck on with Mod Podge. Brilliant!!
Here's the final reveal:
Isn't it beautiful?!?!?
I encourage you to go visit Gloria and show her some blog love.
I have been perplexed on how to deal with damaged veneer (remember this buffet?), but thanks to Gloria and her thinking outside of thedresser box here's a great solution!
Have a great weekend.
Lucky for Gloria, her sister gave it to her. Gloria painted it with white chalkpaint. The veneer on the top was in rough shape, so instead of refinishing it, she covered it with random book pages stuck on with Mod Podge. Brilliant!!
Here's the final reveal:
Isn't it beautiful?!?!?
I encourage you to go visit Gloria and show her some blog love.
I have been perplexed on how to deal with damaged veneer (remember this buffet?), but thanks to Gloria and her thinking outside of the
Have a great weekend.
Labels:
dresser,
Feature Friday,
makeover,
painted furniture,
refinishing
Wednesday, July 6, 2011
Buyer's Remorse???
I found this buffet on Craig's List and picked it up yesterday for $50. I think the shape is beautiful.
But why the buyer's remorse? The veneer is coming off the top and there is some other damage. I guess, it just seems like a lot of work to restore! Also, I see other people's great finds in blogland where they find a beautiful antique sitting curbside for free or at the Salvation Army for $2.99. That doesn't usually happen to me! I have to pay.
Would you have bought this for $50?
Linked here:
Junker Newbie
But why the buyer's remorse? The veneer is coming off the top and there is some other damage. I guess, it just seems like a lot of work to restore! Also, I see other people's great finds in blogland where they find a beautiful antique sitting curbside for free or at the Salvation Army for $2.99. That doesn't usually happen to me! I have to pay.
Would you have bought this for $50?
Linked here:
Junker Newbie
Labels:
buffet
Tuesday, July 5, 2011
Coffee Table
Yesterday I shared my little Saved by Suzy-style stripping tutorial. As you know, I was stripping the top of a coffee table that I primed (oops!) and then decided that I wanted to stain.
Here's what I started out with:
Such a pretty shape, don't you think?
Next, I removed some ugly brass hardware and filled in the holes with wood filler.
Sanding and priming were up next. And then she sat in my garage for a LONG LONG time until I decided what to do. Finally I stripped the top and found some beautiful wood underneath.
I had some blue "oops" paint on hand that I used on the legs, stained the top with Minwax Chestnut, distressed the legs, added a coat of stain to the legs, and finally waxed the top.
Here she is after the big makeover:
I was inspired by this table from Home Decorator's Collection that retails for $209:
Linked:
Today's Creative Blog
Sugar Bee Crafts
Not Just a Housewife
Reasons to Skip the Housework
Bella Before and After
Primitive and Proper
Home Stories of A to Z
Savvy Southern Style
DIY by Design
Tip Junkie
Type A Decorating
http://sistersstuff.blogspot.com/
The Thrifty Home
Domestically Speaking
Primp
A Diamond in the Stuff
Restore Interiors
The Shabby Chic Cottage
Somewhat Simple
Beyond the Picket Fence
Fireflies and Jellybeans
My Simple Home Life
Addicted 2 Decorating
Just a Girl
Remodelaholic
Miss Mustard Seed
Finding Fabulous
Tatertots and Jello
Under the Table and Dreaming
Thrifty Decor Chick
Coastal Charm
Here's what I started out with:
Such a pretty shape, don't you think?
Next, I removed some ugly brass hardware and filled in the holes with wood filler.
Sanding and priming were up next. And then she sat in my garage for a LONG LONG time until I decided what to do. Finally I stripped the top and found some beautiful wood underneath.
I had some blue "oops" paint on hand that I used on the legs, stained the top with Minwax Chestnut, distressed the legs, added a coat of stain to the legs, and finally waxed the top.
Here she is after the big makeover:
I was inspired by this table from Home Decorator's Collection that retails for $209:
Linked:
Today's Creative Blog
Sugar Bee Crafts
Not Just a Housewife
Reasons to Skip the Housework
Bella Before and After
Primitive and Proper
Home Stories of A to Z
Savvy Southern Style
DIY by Design
Tip Junkie
Type A Decorating
http://sistersstuff.blogspot.com/
The Thrifty Home
Domestically Speaking
Primp
A Diamond in the Stuff
Restore Interiors
The Shabby Chic Cottage
Somewhat Simple
Beyond the Picket Fence
Fireflies and Jellybeans
My Simple Home Life
Addicted 2 Decorating
Just a Girl
Remodelaholic
Miss Mustard Seed
Finding Fabulous
Tatertots and Jello
Under the Table and Dreaming
Thrifty Decor Chick
Coastal Charm
How to Strip
A piece of furniture, that is. Just think of the number of "stripping" comments that can be made along with this post. I think my husband tried to make just about all of them!
Anyways, I have never stripped a piece of furniture before. I usually just grab some primer and paint and call it good. I have had this coffee table sitting in my garage for a while now:
It started out like this:
But, then I decided to prime it and get it ready for paint. I didn't really have an inspiration, so I just let it sit and sit and sit and sit.
I have been loving all of the pieces I've seen lately with a stained top and painted body, so I decided to try that. That meant I would have to remove the primer I had so lovingly already applied. UGH!!
I had no idea how to strip a piece of furniture, so I headed to the hardware store to browse the aisles. Here's what I came home with:
Stripper
Paint Thinner a.k.a. Mineral Spirits
Paint Brush
Mixing Cup
Diet Dr. Pepper - do NOT skip this ingredient
I started by applying a thick layer of the stripper. The consistency is similar to hair gel. I dumped it on top of the table and then spread it around with the flat part of the paint brush. According to the directions, you are not supposed to brush the stripper on, just spread it. When applying the stripper, more is more. The thicker the better. Almost immediately, the primer started to bubble, like this:
When working with stripper, be sure to wear gloves. I couldn't find any gloves, but luckily I had some plastic dog poo picking up bags that I wore on my hands. Real professional, I know!
I let the stripper sit for about 15-20 minutes. Here's what it looked like at this point:
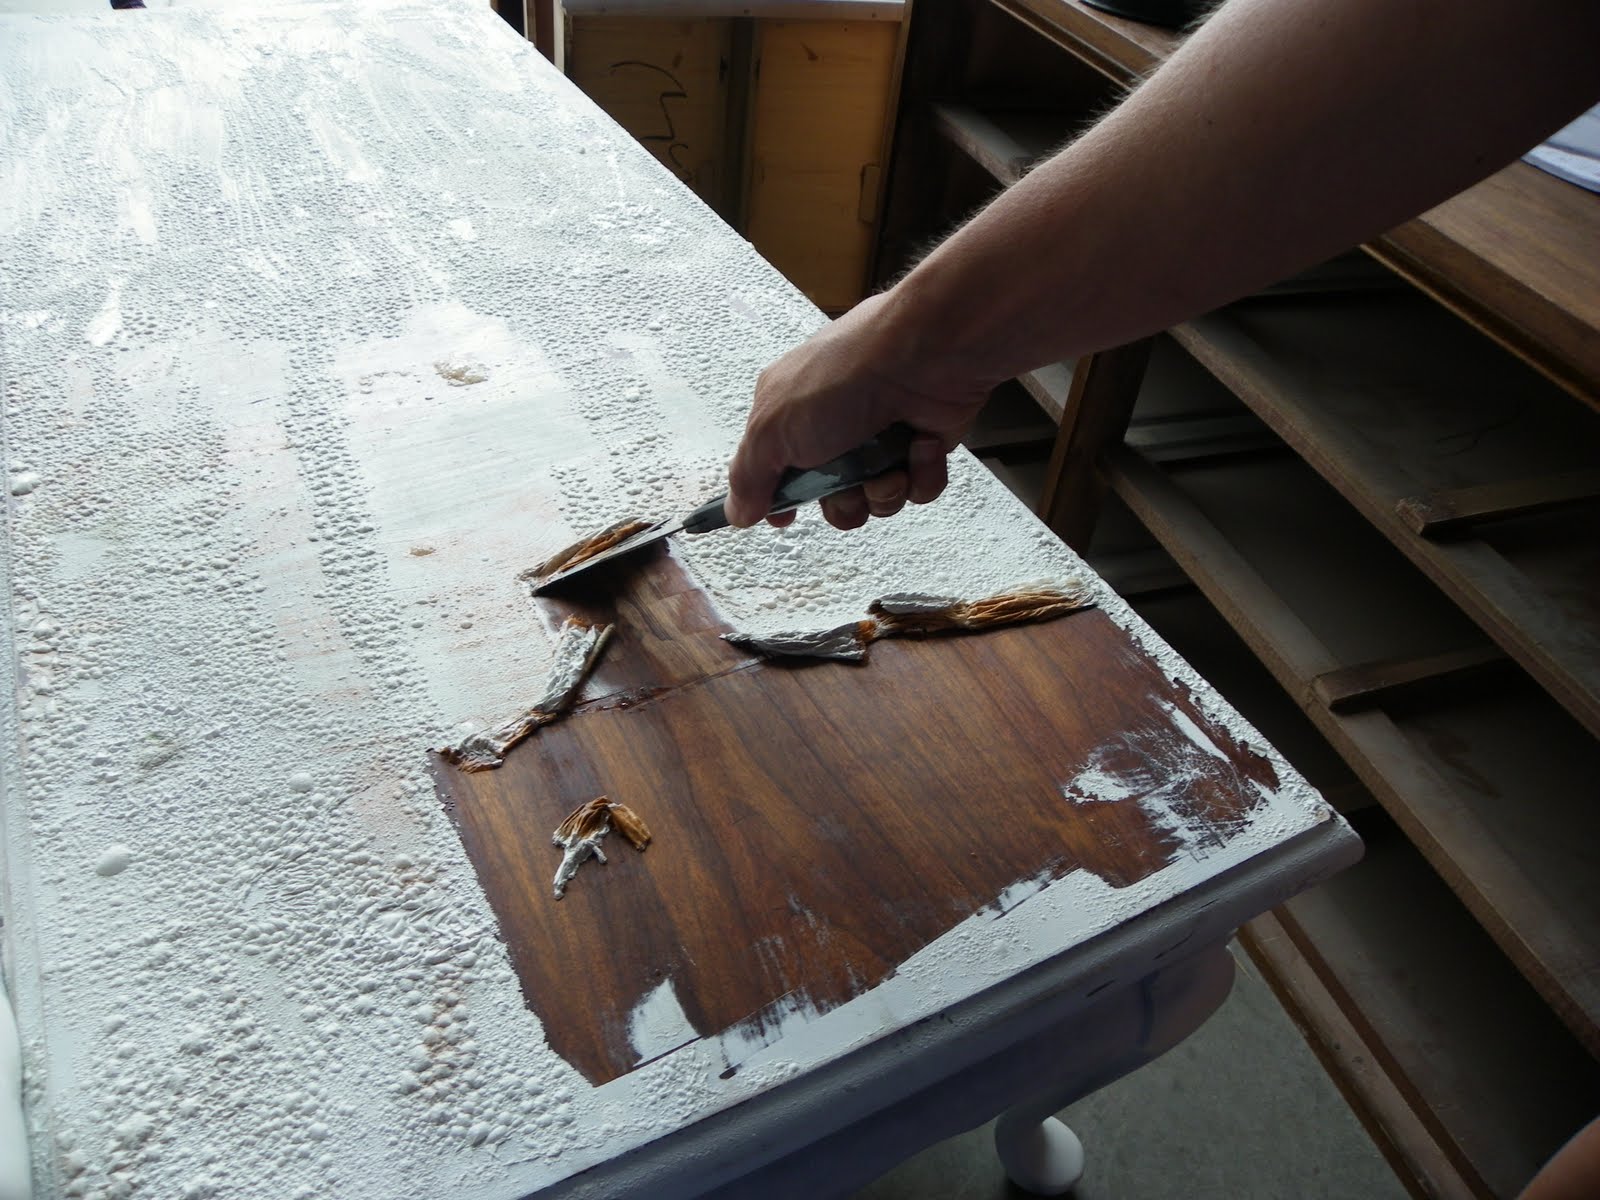
Next, I took a scraper and starting scraped the paint off. It came off very easily in most places:
It didn't come off everywhere, so I applied more stripper. Waited and then scraped those places:
I got most of the paint off and then took a rag and wiped down the remainder. There was still a tiny bit of paint in the cracks, but don't worry about that.
You are not supposed to use a metal scraper because you can scratch the wood. Because I will be distressing this piece, I didn't care if the wood was scratched.
The next step is to wipe the whole thing down with your mineral spirits or paint thinner. I just poured some in my little cup, dipped an old t-shirt in and wiped the table.
Finally, I took another clean, wet rag and gave the piece a final cleaning. I sanded a few small places that still had flecks of paint.
Here's what she looks like after being stripped:
This process was much easier than I expected and took less than an hour start to finish. Don't be afraid, everyone should strip at least once! Please be aware that this is just the easy-peasy way to strip that I came up with. It might not be the exact perfect way to do it. For a better, more professional tutorial, check out this tutorial I found from the Refinish Wizard.
Come back next time to see how I finished off this piece.
Linked:
Today's Creative Blog
Sugar Bee Crafts
Not Just a Housewife
Reasons to Skip the Housework
Bella Before and After
Home Stories of A to Z
Tip Junkie
Type A Decorating
The Thrifty Home
Thrifty 101
Anyways, I have never stripped a piece of furniture before. I usually just grab some primer and paint and call it good. I have had this coffee table sitting in my garage for a while now:
It started out like this:
But, then I decided to prime it and get it ready for paint. I didn't really have an inspiration, so I just let it sit and sit and sit and sit.
I have been loving all of the pieces I've seen lately with a stained top and painted body, so I decided to try that. That meant I would have to remove the primer I had so lovingly already applied. UGH!!
I had no idea how to strip a piece of furniture, so I headed to the hardware store to browse the aisles. Here's what I came home with:
Stripper
Paint Thinner a.k.a. Mineral Spirits
Paint Brush
Mixing Cup
Diet Dr. Pepper - do NOT skip this ingredient
I started by applying a thick layer of the stripper. The consistency is similar to hair gel. I dumped it on top of the table and then spread it around with the flat part of the paint brush. According to the directions, you are not supposed to brush the stripper on, just spread it. When applying the stripper, more is more. The thicker the better. Almost immediately, the primer started to bubble, like this:
When working with stripper, be sure to wear gloves. I couldn't find any gloves, but luckily I had some plastic dog poo picking up bags that I wore on my hands. Real professional, I know!
I let the stripper sit for about 15-20 minutes. Here's what it looked like at this point:
Next, I took a scraper and starting scraped the paint off. It came off very easily in most places:
It didn't come off everywhere, so I applied more stripper. Waited and then scraped those places:
I got most of the paint off and then took a rag and wiped down the remainder. There was still a tiny bit of paint in the cracks, but don't worry about that.
You are not supposed to use a metal scraper because you can scratch the wood. Because I will be distressing this piece, I didn't care if the wood was scratched.
The next step is to wipe the whole thing down with your mineral spirits or paint thinner. I just poured some in my little cup, dipped an old t-shirt in and wiped the table.
Finally, I took another clean, wet rag and gave the piece a final cleaning. I sanded a few small places that still had flecks of paint.
Here's what she looks like after being stripped:
This process was much easier than I expected and took less than an hour start to finish. Don't be afraid, everyone should strip at least once! Please be aware that this is just the easy-peasy way to strip that I came up with. It might not be the exact perfect way to do it. For a better, more professional tutorial, check out this tutorial I found from the Refinish Wizard.
Come back next time to see how I finished off this piece.
Linked:
Today's Creative Blog
Sugar Bee Crafts
Not Just a Housewife
Reasons to Skip the Housework
Bella Before and After
Home Stories of A to Z
Tip Junkie
Type A Decorating
The Thrifty Home
Thrifty 101
Labels:
coffee table,
refinishing,
stripping furniture,
tutorial
Friday, July 1, 2011
Feature Friday #4
For this Feature Friday, I have something a little different for you. Recently, I've been getting some questions on how to reupholster a chair. So, instead of featuring a gorgeous piece of finished furniture, I'm featuring a tutorial from the fabulous Jenny of My Little Green Notebook.
This week, she has written an amazing multi-part tutorial on how to reupholster a chair. Her directions are easy to follow and her pictures are great.
She takes you through all of the steps of reupholstering. First, she teaches you how to strip the chair of its current fabric here.
Next, she shows how to paint the frame.
Then it's on to stapling on the new fabric.
Finally, she even shows how to sew double corded welting.
This is an amazing tutorial! Thanks for putting it together Jenny.
I hope everyone has a great 4th of July weekend!
This week, she has written an amazing multi-part tutorial on how to reupholster a chair. Her directions are easy to follow and her pictures are great.
She takes you through all of the steps of reupholstering. First, she teaches you how to strip the chair of its current fabric here.
Next, she shows how to paint the frame.
Then it's on to stapling on the new fabric.
Finally, she even shows how to sew double corded welting.
This is an amazing tutorial! Thanks for putting it together Jenny.
I hope everyone has a great 4th of July weekend!
Subscribe to:
Posts (Atom)